diy day meets cute overload
10 July 2008It came up recently that I wanted to send some music my sister's way. Truth be told, I considered passing her a few CDs, but it dawned on me quickly enough (through the word of others) that (ahem) in this day and age, there's not much point to such an investment when mp3s are some much more manageable. And here I thought I was up on tech.
Naturally, there's not much too interesting about passing mp3s to another person — via FTP, HTTP, torrents, or whatever — but such measures cheapen the sentiment: when there's no real effort or thought required to sending information, there's less meaning inherent in the transmission. After looking around for awhile for "cutest usb flash drive", it became apparent that there is no current device which optimizes all three sides of the price-cuteness-storage triangle; mimobot comes close, but they're pretty pricey for a 2GB model.
Enter an excellent flickr photo gallery.
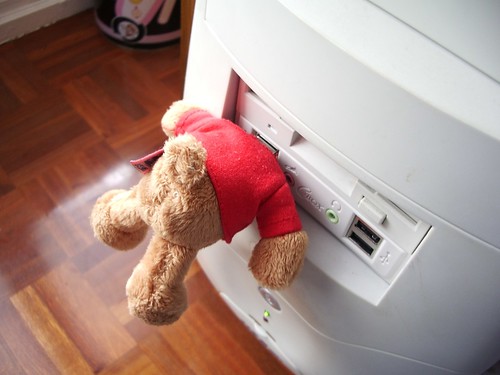 Oso incrustado, absolutely amazing.
I'm by no means a professional tailor, but I took my share of Home Ec in middle school, so I am capable of throwing a stitch or two into things. Enter the truism that there's something innately appealing to an older brother about giving a younger sister a stuffed animal whose head pops off, and there's a project in the works.
What are the necessities? Target can help:
- Cheap stuffed animal ($3.00)
- USB drive with a cap ($20.00)
- Sewing supplies: needle, thread, seam ripper ($5.00)
You can pick up 2GB for far cheaper online, and even in-store, but it's gotten tough (at target) to find USB drives with mountable caps, necessary to mount the head back on the animal. If you're already prepared, $5.00 for sewing materiel is unnecessary, but regardless this is an under-$30.00 project. Perfect.
Alas and alack, I've again forgotten to document the process, but here's a quick run-down:
- Be sure to pick a stuffed animal which has the head sewn on separate from the body. Use a seam ripper to separate the head from the body.
- With the head removed, stuff the USB drive's cap into the head, preferably towards the back: the further back the cap is, the more forward the head will droop when it is attached to the drive; this will maximize the cute factor.
- Tightly re-seam the head opening, getting the USB cap as flush with the fabric as possible. Sew loosely around the cap, then tightly stitch the longitudnal seams extending out from the narrow edges of the cap. Once the cap is solidly placed, use glue — a hot glue gun works wonders — to further attach the cap to the fabric; this will ensure that the cap does not rip from the head when removing the cap from the drive.
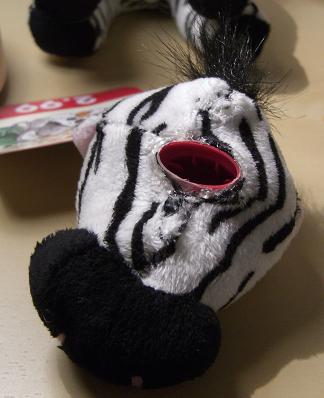 The inserted cap, after restitching and hot glue treatment (big)
 - The USB drive needs to be attached to the inside of the animal, to prevent it from slipping out when the cap is removed, or it is unplugged from the computer. In my case, I found a drive which had a small keyring attached to the end; a quick stitch and knot through the animal's stomach was sufficient to permanently attach the drive, while still leaving it rotatable. When affixing the drive, be sure a sufficient amount of the device peeks out that the cap may still be attached (live and learn!). (if you look closely at the animal's stomach in the next picture, big-sized, you'll see the pinch where the stitch went through)
- Stitch tightly around the USB drive's head, to prevent too much slipping while the cap is removed. In most cases, there should be a nice lip where the cap attaches, which will serve as a grip for the stitching. This, together with the internal attachment from the last step, prevents most movement while still allowing the device — and therefore, the head — to rotate.
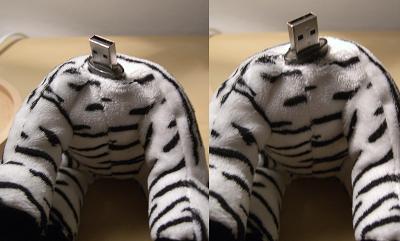 Not applying hot glue to the body allows the head to rotate (big)
final result
Plug it in, pop on some files, and share!
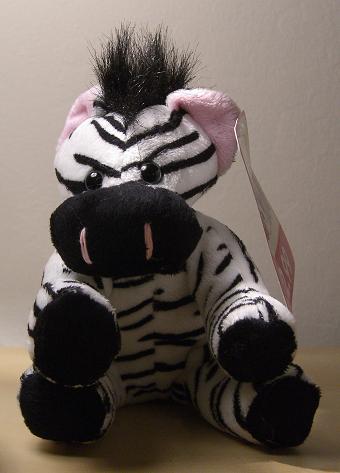 In cute (evil?) mode (big)
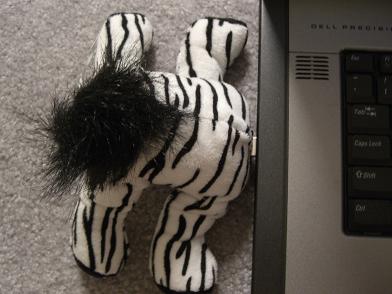 In transfer mode (big)
Creepy, awesome, and full of win. Now I just have to wait for her reaction.
Included \(\LaTeX\) graphics are generated at LaTeX to png or by  .
.
contemporary entries
- embeddable maps on routeslipper (18 July 2008)
- lessons in python (17 July 2008)
- diy day meets cute overload (10 July 2008)
- roshambo, markov chains, and a teaspoon of lulz (30 March 2008)
- beautiful people (16 March 2008)
view all entries »
comments
there are no comments on this post
Sorry, further commenting on this post has been disabled. For more information, contact me.